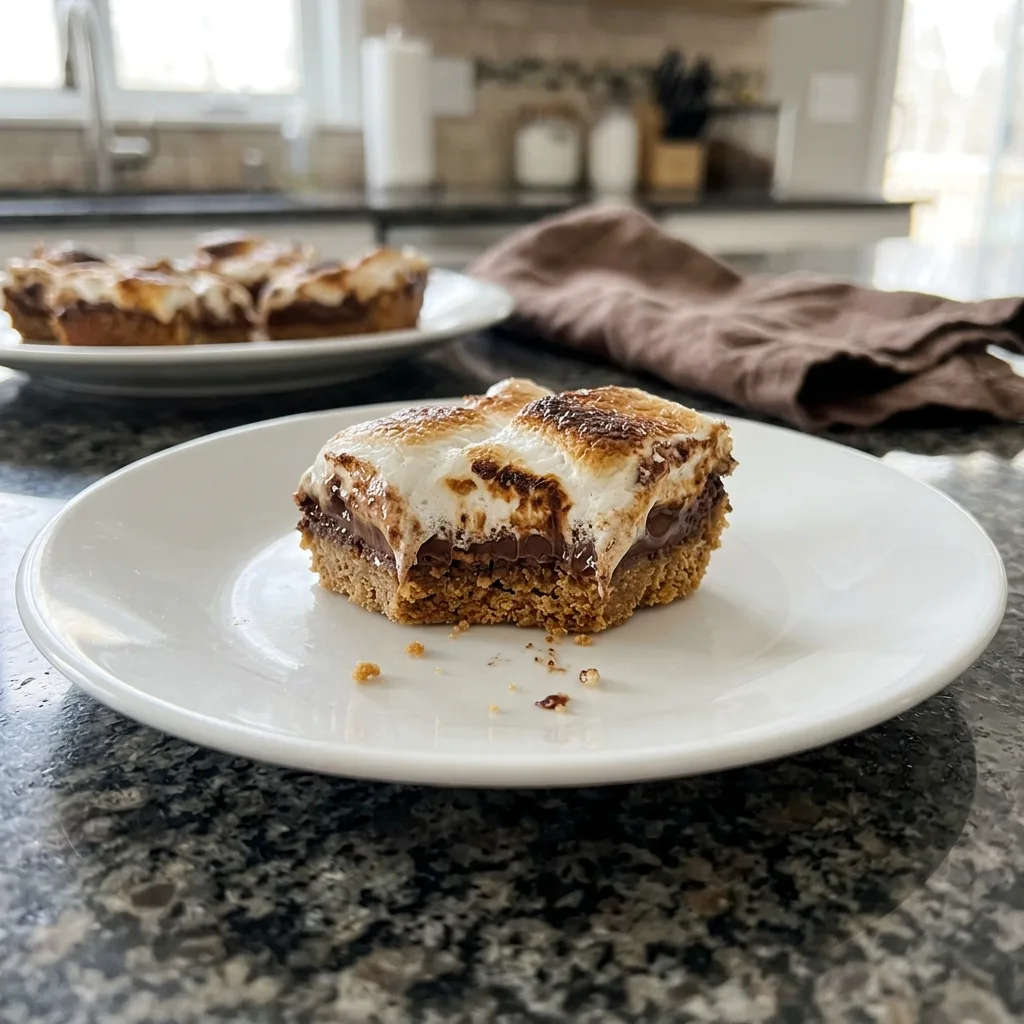
Easy gooey s'mores bars with a buttery graham cracker crust, melted milk chocolate and toasted marshmallows. No mixer needed, ready in about 35 minutes and makes 16 bars.
A buttery graham cracker crust is covered with melted milk chocolate and a golden layer of toasted marshmallows, so you get campfire flavor straight from the oven.
Prep15 min
Cook20 min
Total1 hr 35 min
Serves16
LevelEasy
What makes it special
Graham crackers
Milk chocolate
Mini marshmallows
Butter
Everything people love about campfire s’mores comes together in these gooey s’mores bars, with no fire, no sticks and no sticky fingers before dessert. A buttery graham cracker crust is topped with a thick layer of melted milk chocolate and a blanket of golden toasted marshmallows, then cut into neat squares that are crisp at the bottom, rich in the middle and soft and sweet on top.
The bars take about fifteen minutes to put together, and the oven does the toasting. There is no mixer, no eggs and no complicated technique, only a bowl, a pan and a few pantry ingredients. They are perfect for a party, a school bake sale, a family movie night or any evening that needs a little sweetness.
Why you will love these s’mores bars
S’mores bars are one of those desserts that disappear fast, and there are plenty of reasons for that:
All the s’mores flavor. Graham cracker, chocolate and toasted marshmallow in every bite, just like the campfire treat.
Only a few ingredients. Graham crackers, butter, sugar, chocolate chips and marshmallows are all you need.
No mixer and no eggs. The crust is stirred by hand, and the layers are simply stacked.
Quick to make. Fifteen minutes of prep and about twenty minutes of baking, plus time to cool.
Great for a crowd. One pan makes sixteen generous squares that are easy to serve and carry.
Fun for kids to help with. Pressing the crust and sprinkling on the marshmallows are easy jobs for little hands.
What makes a great s’mores bar
The best s’mores bars have three clear layers that each do a job. The crust should be firm enough to hold together when you lift a bar but tender enough to bite through easily. The chocolate should be thick and melted, not hard. The marshmallow should be soft and toasty on top, with golden brown spots and a gooey center.
The secret is in the details: pressing the crust firmly, melting the chocolate gently in the oven and watching the broiler closely at the end. Each step takes only a few minutes, and the result looks and tastes like bakery dessert.
Ingredients you will need
The ingredient list is short, and each one matters. Here is what you need and why:
Graham cracker crumbs: they form the crisp, honey scented base. Crush whole crackers in a bag or a food processor until they look like fine sand.
Melted butter: it binds the crumbs and gives the crust a rich, buttery flavor.
Granulated sugar: a small amount sweetens the crust and helps it hold together.
Milk chocolate chips: they melt into a smooth layer and taste just like a classic chocolate bar.
Mini marshmallows: they toast evenly and cover the chocolate in a soft, sweet layer.
Salt: a pinch in the crust sharpens the flavor of the chocolate and graham.
Vanilla extract: it adds a warm background note to the crust.
Milk chocolate gives the closest flavor to the traditional s’more, but semi sweet chips work well too if you prefer a deeper, less sweet taste. You can also use a mix of both.
Graham cracker crumbs: store bought or homemade
Packaged graham cracker crumbs save time, and they work perfectly. If you prefer to make your own, you need about twelve whole graham crackers, which are about six full sheets broken into their rectangles. Pulse them in a food processor, or seal them in a zipper bag and roll with a rolling pin until fine.
Measure the crumbs after crushing, not before. Eleven to twelve crackers should give about one and a half cups. Fine, even crumbs make a crust that holds together cleanly, while coarse crumbs can make bars that fall apart when cut.
How to make s’mores bars, step by step
The method is easy, and the order of the steps gives you the best texture.
Prepare the pan. Heat the oven to 350 degrees Fahrenheit. Line a 9 by 9 inch pan with parchment paper, leaving an overhang on two sides so you can lift the bars out later.
Make the crust. Stir the graham cracker crumbs, melted butter, sugar, vanilla and salt until the mixture looks like wet sand. Press it firmly and evenly into the pan with the bottom of a measuring cup.
Bake the crust. Bake for 10 minutes until it is set and smells toasty. Remove it from the oven.
Add the chocolate. Sprinkle the chocolate chips over the warm crust and return the pan to the oven for 3 minutes, until the chips look shiny and soft.
Spread the chocolate. Use an offset spatula or the back of a spoon to spread the melted chocolate into an even layer.
Add the marshmallows. Cover the chocolate with mini marshmallows, pressing them down gently so they stay in place.
Toast the top. Bake for 5 minutes, then switch the oven to broil for 1 to 2 minutes, watching constantly, until the marshmallows are puffed and golden brown.
Cool and cut. Cool the pan on a rack for at least 1 hour, lift out with the parchment and cut into 16 bars with a greased knife.
The broiler step happens fast. Marshmallows go from golden to burnt in seconds, so stay in front of the oven and rotate the pan if one side browns faster. A few dark spots are perfect, because that is how a real toasted marshmallow looks.
Tips for the best s’mores bars
Press the crust firmly. Use the bottom of a flat measuring cup and press hard into the corners. A firm crust makes clean bars.
Line the pan with parchment. It makes lifting and cutting simple and prevents sticking.
Warm the chocolate in the oven. The residual heat from the crust and a short bake melts the chips evenly without scorching.
Spread the chocolate thin and even. A smooth layer makes each bite taste balanced.
Use a greased knife to cut. Marshmallow sticks to everything. A knife brushed with butter or sprayed with oil glides through.
Let them cool completely. Warm bars are very gooey and will not hold their shape. An hour of cooling makes neat squares.
How to cut clean s’mores bars
Marshmallow makes cutting a little messy, but a few tricks give you tidy squares. First, let the bars cool for the full hour so the chocolate and marshmallow can set. Second, lightly grease a sharp knife and wipe it clean between cuts.
For the neatest edges, chill the pan in the refrigerator for thirty minutes before slicing, then let the bars sit for a few minutes at room temperature. You can also use kitchen scissors dipped in hot water to snip through the marshmallow. The first bar is always the messiest, so keep it for the baker.
Variations to try
The classic version is delicious as written, and it is also easy to change.
Peanut butter s’mores bars. Drizzle a little melted peanut butter over the chocolate before adding the marshmallows.
Dark chocolate bars. Use semi sweet or dark chocolate chips for a richer, less sweet bar.
Cookie butter bars. Spread a thin layer of cookie butter over the crust before the chocolate.
Salted caramel bars. Drizzle caramel sauce over the chocolate and finish with flaky salt.
Cinnamon graham crust. Add half a teaspoon of cinnamon to the crumbs for a warm, spiced edge.
Mini chocolate bar topping. Press a few squares of chocolate bar into the marshmallows right after broiling for a pretty finish.
Using a different pan
A 9 by 9 inch pan gives thick, generous bars. If you prefer thinner bars, press the crust into a 9 by 13 inch pan and double the chocolate and marshmallows. Bake times stay similar, but watch the broiler closely because the larger surface toasts at different speeds.
A metal pan gives a crisper crust than glass, and glass keeps heat longer, so check glass pans a little earlier. Always line the pan with parchment, whatever you choose, so the bars lift out in one piece.
How to fix common problems
Crust that is crumbly. It needs a little more butter, or it was not pressed firmly enough. Add a tablespoon of melted butter next time and press harder.
Marshmallows that slide off. The chocolate layer may have cooled too much. Add marshmallows while the chocolate is still soft.
Burnt marshmallows. The pan was too close to the broiler. Move the rack lower and watch at all times.
Hard chocolate. The chips did not melt long enough. Bake a minute more, or use a bit more chocolate.
Bars that fall apart. They were cut while warm. Wait until completely cool before slicing.
Storage, make ahead and freezing
S’mores bars keep well. Store them in an airtight container at room temperature for up to three days, with parchment between the layers so they do not stick together. In warm weather, keep them in the refrigerator and let them sit for a few minutes before serving.
To freeze, wrap the cooled and cut bars individually in plastic wrap, place them in a freezer bag and freeze for up to two months. Thaw overnight in the refrigerator. For the best texture, you can also freeze the baked crust and chocolate layer, then add fresh marshmallows and toast them on the day you serve the bars.
Frequently asked questions
Can I use large marshmallows? Yes, but cut them in half with scissors and lay them cut side down so they cover the pan evenly.
Can I use a chocolate bar instead of chips? Yes. Chop about eight ounces of milk chocolate and use it in place of the chips.
Can I make them without the broiler? You can bake them a few minutes longer, but the broiler gives the toasted look. A kitchen torch is another good option.
Are they gluten free? Not as written. Use gluten free graham style crackers to make a gluten free version.
Can I double the recipe? Yes. Use a 9 by 13 inch pan and double the ingredients.
A quick guide to the flavors
These bars taste like a campfire because of the combination of three flavors. Graham crackers bring honey and warm spice. Chocolate brings creamy, deep sweetness. Toasted marshmallow brings caramelized sugar and a hint of smoke.
A pinch of salt in the crust pulls everything together, and a splash of vanilla rounds off the edges. If your bars taste too sweet, use semi sweet chocolate. If you want more smoky flavor, toast the marshmallows a little longer until they are deeply golden.
Make it a family activity
S’mores bars are a wonderful baking project for children. Younger kids can crush the crackers in a bag, press the crust into the pan and scatter the marshmallows. Older kids can melt the chocolate and spread it. An adult should handle the oven and the broiler.
Making them together turns an ordinary evening into a small celebration. Serve the bars with cold milk, set up a movie and you have a cozy night that feels like camping without leaving the living room.
Budget and shopping notes
These bars are very affordable. A box of graham crackers, a bag of chocolate chips and a bag of marshmallows cost less than a few bakery treats and make sixteen servings. You may already have the butter and sugar at home.
Store brand chocolate chips and marshmallows work just as well as name brands. Buy mini marshmallows rather than large ones, because they spread more easily and toast more evenly, and keep any leftover bag sealed so it does not dry out.
Common mistakes to avoid
Not pressing the crust. A loose crust crumbles when you cut the bars.
Walking away from the broiler. Marshmallows burn in seconds.
Cutting too early. Warm bars are messy and lose their shape.
Using stale graham crackers. Old crackers taste flat. Use a fresh box for the best flavor.
Skipping the parchment. Without it, the bars can stick to the pan.
Overfilling the pan. A thick layer of marshmallow may not toast evenly. One even layer is best.
A closer look at the marshmallow topping
Marshmallows are made of sugar, corn syrup, gelatin and air, and when they are heated, the sugar melts and caramelizes on the surface. That is where the golden brown color and toasted flavor come from. Under the broiler, only the top layer browns, while the inside turns soft and gooey.
Mini marshmallows give you more toasted surface than large ones, so more of each bar tastes of caramel. For extra gooey bars, scatter a few extra marshmallows on top before the broiler step. For a neater look, arrange them in a single even layer with no gaps.
Timing guide
Here is how the time breaks down. Prep takes about fifteen minutes. The crust bakes for ten minutes, the chocolate melts for three minutes and the marshmallows bake for five minutes and toast for one to two. Plan on about one hour of cooling before you cut.
If you need dessert in a hurry, chill the pan in the refrigerator for twenty minutes after cooling for twenty. The bars will be set enough to slice, though the marshmallow will be a little softer than usual.
Make it lighter or richer
For a lighter treat, cut the bars into twenty four smaller squares. The flavor is just as satisfying in a smaller portion, and it makes the pan serve more people at a party.
For a richer treat, add a layer of peanut butter or cookie butter under the chocolate, or stir chopped nuts into the chips. A drizzle of melted dark chocolate over the marshmallow after baking makes the bars look like they came from a bakery.
Serving ideas
S’mores bars are lovely on their own, and they also pair well with simple extras:
Cold milk or hot cocoa: the classic partners for any chocolate treat.
Vanilla ice cream: a warm bar with a scoop on top is a special dessert.
Fresh strawberries: their tartness balances the sweetness.
A cup of coffee: a good match for the chocolate and caramelized flavors.
A dessert platter: arrange the bars with cookies and fruit for a party table.
Why the crust matters
The crust is the foundation of the whole bar, and it deserves a little attention. A good graham crust is crisp at the edges, firm in the center and tastes of toasted honey. It should hold the chocolate and marshmallow without turning soggy, and it should break cleanly under a fork.
Baking the crust before adding the toppings is what gives it that firmness. The butter and sugar melt together and set as the crust cools, which acts like glue between the crumbs. If you skip the pre bake, the crust stays soft and the bars can slump when you cut them.
Gifting and sharing
S’mores bars travel well, which makes them a good choice for gifts and potlucks. Cut them into squares, stack them in a tin with parchment between the layers and tie the lid with a ribbon. Add a small card with the name of the recipe, and you have a thoughtful homemade present.
For school events, wrap each bar in clear cellophane so the sweet, sticky top stays protected. Keep them cool in summer, and check for nut allergy rules before you add any variations that include peanut butter.
Final thoughts
These s’mores bars bring back the memory of a campfire in the easiest possible way. A buttery graham crust, a layer of melted chocolate and a golden cloud of toasted marshmallow make a dessert that looks impressive and takes very little effort.
Bake a pan for your next gathering and watch how fast the squares disappear. Keep the recipe handy, because once people taste them, you will be asked to make them again and again.
Easy gooey s'mores bars with a buttery graham cracker crust, melted milk chocolate and toasted marshmallows. No mixer needed, ready in about 35 minutes and makes 16 bars.
Bars Easy American
Prep
15 min
Cook
20 min
Total
1 hr 35 min
Servings
16
Ingredients 7 items
Tap to check off as you go
For the crust
For the topping
Instructions 8 steps
1
Prepare the pan
Heat the oven to 350 F (175 C). Line a 9 by 9 inch pan with parchment, leaving an overhang on two sides.
2
Mix the crust
Stir the graham crumbs, melted butter, sugar, vanilla and salt until the mixture looks like wet sand.
3
Press the crust
Press the mixture firmly and evenly into the pan with the bottom of a measuring cup.
4
Bake the crust
Bake 10 minutes until set and toasty.
5
Melt the chocolate
Sprinkle the chocolate chips over the warm crust and bake 3 minutes until soft and shiny, then spread into an even layer.
6
Add the marshmallows
Cover the chocolate with the mini marshmallows and press them down gently.
7
Toast the top
Bake 5 minutes, then broil 1 to 2 minutes, watching closely, until puffed and golden brown.
8
Cool and cut
Cool at least 1 hour, lift out with the parchment and cut into 16 bars with a greased knife.
Nutrition per serving
Calories
210
Protein
2g
Carbs
31g
Fat
9g
Sugar
22g
Fiber
1g
Sodium
110mg
Questions, answered
Can I use large marshmallows?
Yes. Cut them in half with scissors and place them cut side down in one even layer.
Can I use a chocolate bar?
Yes. Chop about 8 oz of milk chocolate and use it instead of the chips.
How do I cut them cleanly?
Cool fully, chill 30 minutes and use a greased knife, wiping it between cuts.
How do I store them?
Keep in an airtight container up to 3 days with parchment between the layers.
Recipe by
Denise
Home cook, baker and serial recipe tweaker. I share the dishes my family asks for most, written step by step so they turn out right in your kitchen too.