Denise's Creative Corner Crochet · Kitchen
Free Crochet Patterns Handmade with Love

Lilac Flower Granny Square Bed Cover with Rings Crochet Pattern
Jump to Pattern
Lilac Flower Granny Square Bed Cover with Rings Crochet Pattern
130-160 Hours 0 made this
Intermediate Level

You need to know sc, hdc, dc and how to sew simple seams.

130 to 160 Hours

Every square is small and portable, so you can work a little each evening.

Ring Fringe Edge

Round rings join the squares and hang along the edge for a soft, lacy finish.

About This Lilac Flower Granny Square Bed Cover with Rings Crochet Pattern Pattern

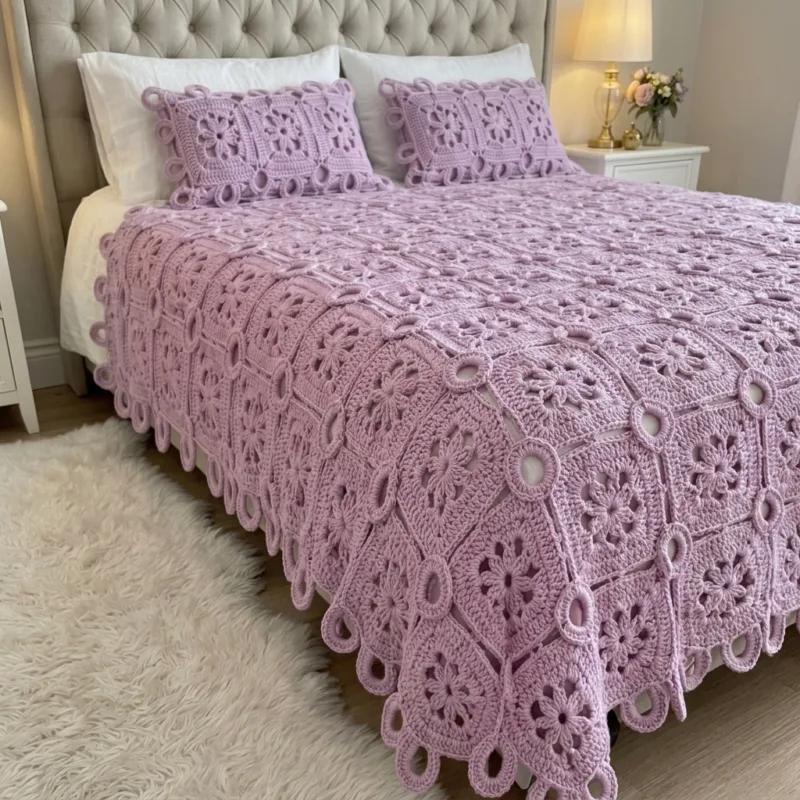
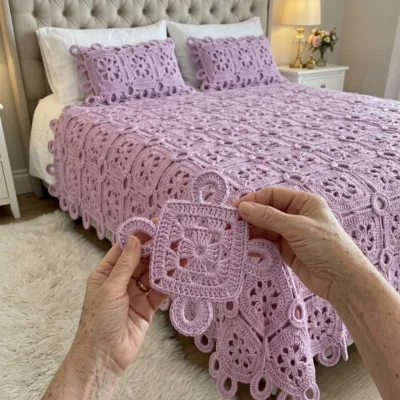
This bed cover is made from 80 open lace flower squares in one soft lilac purple, each with a six-petal flower at the center and small windows between the petals. The squares are joined in a grid of 8 across and 10 down, and a round ring is sewn over every place where four corners meet. The rings around the outer edge hang off the cover as a loop fringe. The finished size is about 66 by 82 inches.

You will use single crochet, half double crochet, double crochet and loose whipstitch seams, and the pattern also gives two pillow covers made of 6 squares each. It suits an intermediate maker who wants a long, calm project for a full bed.
Lilac Flower Granny Square Bed Cover with Rings Crochet Pattern step detail

Why You'll Love This Lilac Flower Granny Square Bed Cover with Rings Crochet Pattern Pattern

I love that every square is its own small project. I can tuck a ball of yarn in a tote, work one flower on the couch, and finish a ring while the tea cools. The petals and little windows keep each square interesting from start to end.

This cover also makes a thoughtful gift for a wedding or a new home. One soft color lets the stitch texture and the rings do all the work, and it looks calm and cozy on a bed with a tufted headboard.

Switch Things Up

Try the same pattern in cream, soft rose or dusty blue, or work the flower center in a deeper plum and the rest in lilac. For a throw, make 5 by 6 squares for about 40 by 48 inches with the rings. For a baby blanket, make 4 by 4 squares in a soft cotton. You can also skip the fringe and sew the rings only at the inner junctions for a flatter edge.


Materials Needed

— Main Fabric

01 Worsted weight 100 percent cotton yarn in soft lilac purple: about 5,300 yd (about 2,700 g), for 92 squares, 123 rings and all the joining
02 Yardage is an estimate for the 66 by 82 inch cover plus two pillow fronts, so buy about 10 percent extra and use one dye lot
03 Optional: two pillow forms of about 16 by 24 inches and cotton or linen fabric for the pillow backs

— Tools Required

04 4.5 mm (7) crochet hook
05 123 plastic rings, 1 inch (25 mm) across
06 Yarn needle
07 Stitch markers
08 Scissors
09 Blocking mats and rust-proof pins
10 Measuring tape

The Free Pattern

Intermediate 130-160 Hours

0% complete

— Flower Square (Make 92, lilac) :

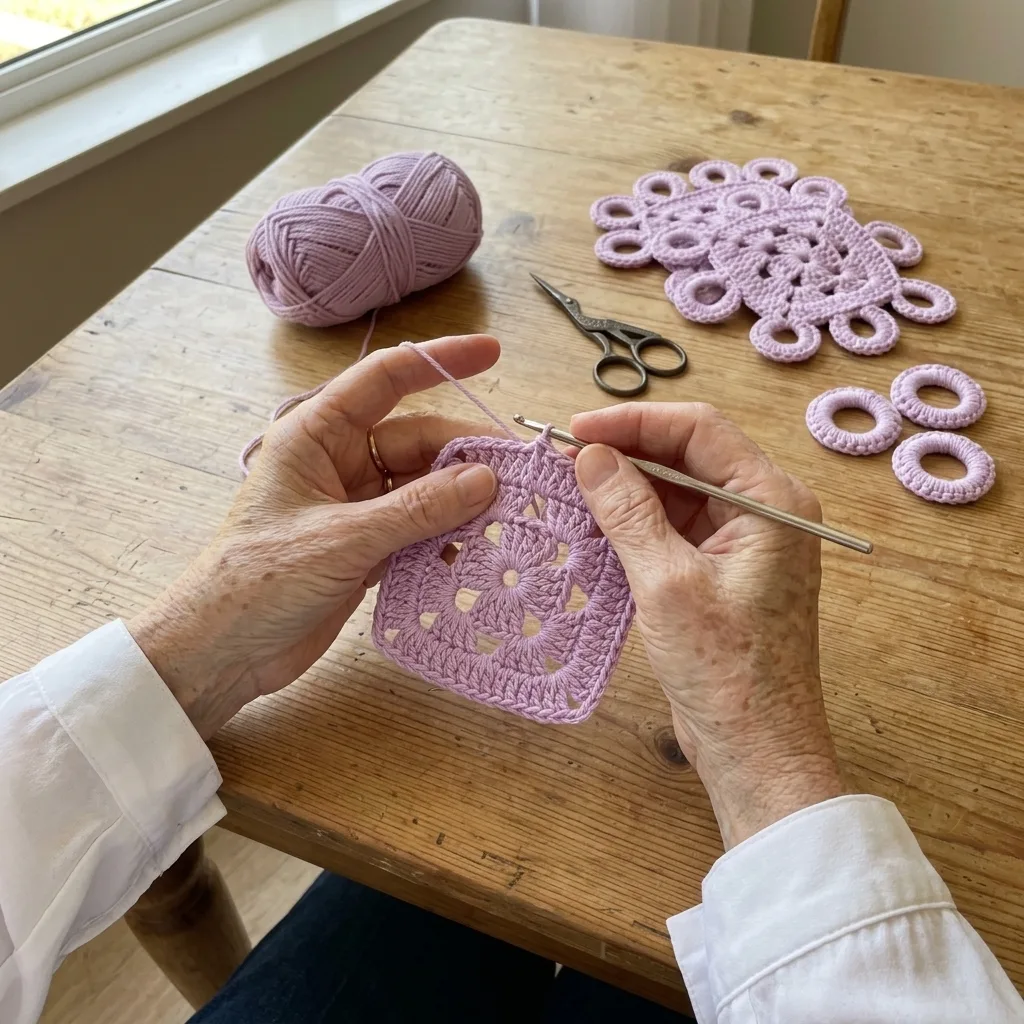
Use the 4.5 mm (7) hook. The center is a six-petal flower, and the rounds that follow turn it into a square with open windows. Every corner is worked as 2 dc, ch 2, 2 dc in the corner.
Round 1: Make a magic ring, ch 1, 12 sc in the ring. Join with a sl st to the first sc. (12 sc)
Round 2: Ch 1, sc in the same st. *Ch 5, skip the next st, sc in the next st; repeat from * 4 more times. Ch 5, skip the last st and join with a sl st to the first sc. (6 sc and 6 ch 5 loops)
Round 3: Ch 1. *Work (sc, hdc, 3 dc, hdc, sc) in the next ch 5 loop, then sl st in the next sc of Round 2; repeat from * 5 more times, ending with the last sl st in the first sc of Round 2. (6 petals of 7 sts each, 42 sts)
Round 4: Sl st in the first sc of the first petal. Ch 1, sc in the same st, sc in each of the next 6 sts of the petal, sc in the sl st between this petal and the next. *Sc in each of the 7 sts of the next petal, sc in the next sl st; repeat from * 4 more times. Join with a sl st to the first sc. (48 sc)
Round 5: Sl st in the next sc. Ch 3 (counts as dc), 1 dc in the same st, ch 2, 2 dc in the same st for the first corner. Dc in each of the next 11 sc. *Work 2 dc, ch 2, 2 dc in the next sc for a corner, dc in each of the next 11 sc; repeat from * 2 more times. Join with a sl st to the top of the beginning ch 3. (60 dc and 4 ch 2 corner spaces, 15 dc along each side between corner spaces)
Round 6: Sl st in the next dc and in the next ch 2 space. Ch 3, 1 dc in the same space, ch 2, 2 dc in the same space. *Dc in the next dc, then (ch 1, skip the next dc, dc in the next dc) 7 times. Work 2 dc, ch 2, 2 dc in the next ch 2 space; repeat from * 2 more times. Dc in the next dc, then (ch 1, skip the next dc, dc in the next dc) 7 times. Join with a sl st to the top of the beginning ch 3. (48 dc, 28 ch 1 spaces and 4 ch 2 corner spaces)
Round 7: Sl st in the next dc and in the next ch 2 space. Ch 3, 1 dc in the same space, ch 2, 2 dc in the same space. *Dc in each of the next 19 sts, working 1 dc in each dc and in each ch 1 space, then work 2 dc, ch 2, 2 dc in the next ch 2 space; repeat from * 2 more times. Dc in each of the last 19 sts. Join with a sl st to the top of the beginning ch 3. (92 dc and 4 ch 2 corner spaces, 23 dc along each side between corner spaces)
Round 8: Sl st in the next dc and in the next ch 2 space. Ch 1, 3 sc in the same space, sc in each of the next 23 dc. *3 sc in the next ch 2 space, sc in each of the next 23 dc; repeat from * 2 more times. Join with a sl st to the first sc. Fasten off and weave in the ends. (104 sc: 4 corners of 3 sc and 4 sides of 23 sc)

— Ring (Make 123, lilac) :

Use the 4.5 mm (7) hook and a 1 inch (25 mm) plastic ring. Make 99 rings for the cover and 24 for the two pillow covers. Add or remove 1 or 2 sc in Round 1 if the stitches bunch up or leave gaps.
Round 1: Join yarn to the plastic ring with a sl st. Ch 1, work 20 sc around the ring, covering the plastic completely. Join with a sl st to the first sc. (20 sc)
Round 2: Ch 1, sc in each sc around. Join with a sl st to the first sc. Fasten off, leaving a 12 inch tail for sewing. (20 sc)

— Layout :

The cover is 8 squares wide and 10 squares long, 80 squares in all, all in lilac. The grid has 9 by 11 junctions, which is 99 places for rings. Of these, 63 sit at inner junctions and 36 sit around the outer edge.
Rows 1 to 10: 8 flower squares in every row, all turned the same way so the flowers sit upright and the corners line up. (80 squares)

— Pillow Covers (Make 2) :

Each pillow cover front uses 6 squares and 12 rings, for a front of about 24 by 16 inches. The squares and rings come from the totals above, 92 squares and 123 rings in all.
Front: Join 6 squares, 3 across and 2 down, with whipstitch. Sew a ring over each of the 12 junctions of the front. (6 squares and 12 rings)
Back: Cut a fabric back to 25 by 17 inches, sew it to the front along three sides with a small seam allowance, and finish the fourth side with an overlap for the pillow form.

— Border (Ring Fringe) :

Step 1: Sew a ring over each of the 63 inner junctions of the cover, stitching it through all four corner groups of 3 sc. (63 rings)
Step 2: Sew a ring at each of the 36 junctions around the outer edge so that half of the ring hangs past the edge as fringe. (36 rings)

Assembly Instructions

  1. Block all 92 squares to about 8 inches (20 cm) so the corners are sharp and the squares match.
  2. Lay out 80 squares in 10 rows of 8 following the Layout section, then whipstitch each row together and join the rows with loose seams.
  3. Make the 123 rings and cover each plastic ring completely with single crochet.
  4. Sew a ring over each of the 63 inner junctions, then sew the 36 outer rings so that half of each hangs past the edge as the Border fringe.
  5. For each Pillow Cover, join 6 squares, sew the 12 rings and attach the fabric back.
  6. Weave in all the ends and block the finished cover flat, letting it dry fully before use.

Common Mistakes & How to Fix Them

Letting the squares drift in size. Measure your first square against 8 inches and go down a hook size if it comes out larger, because 80 squares magnify even a small difference.

Skipping the corner pattern. If a corner is worked as 3 dc instead of 2 dc, ch 2, 2 dc, the square curls and will not sit flat.

Sewing the rings loosely at the junctions. Stitch each ring through all four corners twice, or it will wobble and pull the seams open.

Working the rings too tight around the plastic. If the stitches bunch up, use 19 sc and keep the tension relaxed.


Denise photo
Denise

Denise is a crochet designer who writes clear, round by round patterns for cozy home projects.


Important Notes

Gauge: after Round 7 a square should measure about 7.5 inches, and about 8 inches after Round 8 and blocking.

Yardages are estimates, so keep a spare ball of the same dye lot.

Cotton has little stretch, so block on a flat surface and let the squares dry fully before joining.

Wash in cool water on a gentle cycle and dry flat to keep the rings round and the squares crisp.


I hope this cover finds a place in a soft, sunny bedroom, and in your hands one flower at a time. Take your time, enjoy each little ring, and make it your own.

Crochet Abbreviations

01 ch — chain
02 sl st — slip stitch
03 sc — single crochet
04 hdc — half double crochet
05 dc — double crochet
06 st(s) — stitch(es)

You Ask, We Answer

How big is the finished bed cover?

The grid is 8 squares by 10 squares at about 8 inches each, so about 64 by 80 inches, and the hanging rings bring it to about 66 by 82 inches. It suits a full bed with a short drape.

Can I use a different color or yarn weight?

Yes. Any worsted weight cotton works with the hook given. For a different size, make a smaller grid, such as 5 by 6 squares for a throw, and check a first square before you start.

How do I wash and care for the cover?

Machine wash cool on a gentle cycle or hand wash, and lay it flat to dry. Avoid hot water and strong bleach so the color and the rings stay neat.