Denise's Creative Corner Crochet · Kitchen
Free Crochet Patterns Handmade with Love

Vintage Rose Filet Table Runner Crochet Pattern
Jump to Pattern
Vintage Rose Filet Table Runner Crochet Pattern
25-30 Hours 0 made this
Intermediate Level

Uses dc filet mesh, small flower strips and simple shaped leaves.

Make It In Pieces

About 25 to 30 hours, and every rose and leaf is a small quick project.

Garden Look

A winding line of dimensional roses makes your table look like a fresh bouquet.

About This Vintage Rose Filet Table Runner Crochet Pattern Pattern

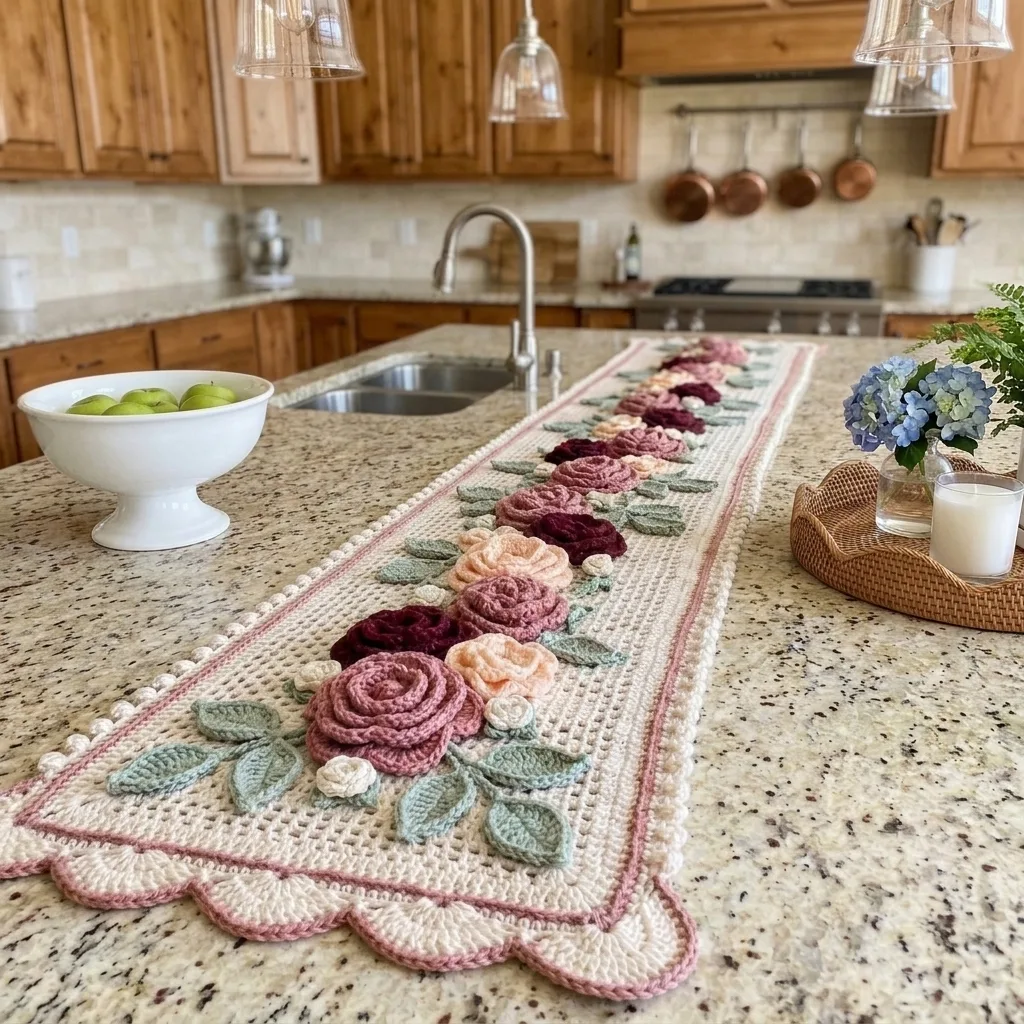
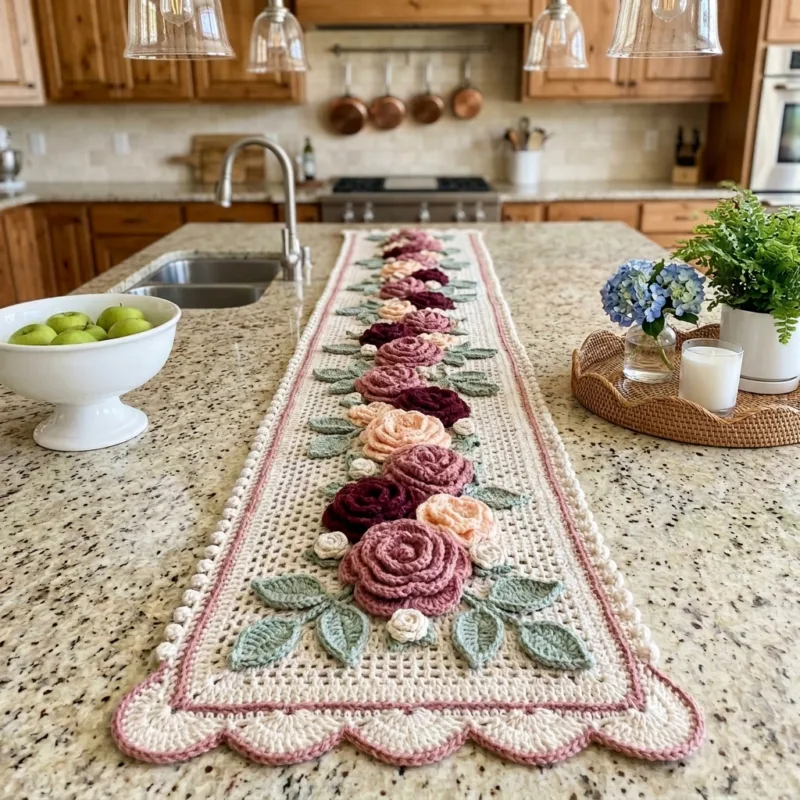
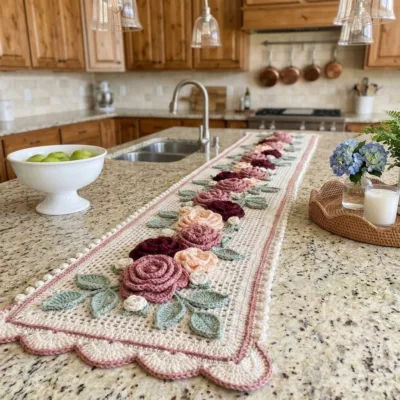
This table runner is about 38 inches long and 9 inches wide, including the scalloped ends and the edge trim. The center is a light filet mesh of double crochet and chain spaces, outlined with a thin dusty rose line and finished with a row of tiny pearl bobbles on both long edges.

Twelve dimensional roses in dusty rose, deep burgundy and peach run down the middle, with small cream rosebuds and sage green leaves tucked in between. It is worked in light weight cotton, so the mesh stays crisp and the roses keep their shape.
Vintage Rose Filet Table Runner Crochet Pattern step detail

Why You'll Love This Vintage Rose Filet Table Runner Crochet Pattern Pattern

I love how plain the mesh looks until the roses go on. Each rose is just one ruffled strip that you roll up, so it feels like magic every time.

The pearl bobble edge is my favorite little detail. It gives the runner a soft, vintage frame without any extra work at the end.

Switch Things Up

Try all-white roses with silver-grey leaves for a winter table, or golden yellow and olive green for autumn. You can also make the roses in soft blue and cream for a spring look, or use worsted weight yarn with a 4.0 mm hook for a wider runner with bigger flowers.


Materials Needed

— Main Fabric

01 Light weight (#3) cotton yarn, cream: about 250 g (about 600 yds) for the mesh, edge trim, scalloped ends, rosebuds
02 Light weight (#3) cotton yarn, dusty rose: about 100 g (about 240 yds) for the outline, roses and scallop rims
03 Light weight (#3) cotton yarn, deep burgundy: about 50 g (about 120 yds) for the burgundy roses
04 Light weight (#3) cotton yarn, peach: about 40 g (about 100 yds) for the peach roses
05 Light weight (#3) cotton yarn, sage green: about 50 g (about 120 yds) for the leaves

— Tools Required

06 3.25 mm (D-3) crochet hook for the mesh, border, trims and roses
07 2.75 mm (C-2) crochet hook for the rosebuds and leaves
08 Yarn needle
09 Stitch markers
10 Scissors
11 Rust-proof pins and blocking mats

The Free Pattern

Intermediate 25-30 Hours

0% complete

— Filet Mesh Center (Make 1) :

Use cream and the 3.25 mm hook. The mesh is worked back and forth, and the finished center measures about 36 by 7 inches before the border.
Row 1: ch 51, dc in 5th ch from hook (first 4 ch count as dc and ch 1), *ch 1, skip 1 ch, dc in next ch*, repeat 23 times (25 dc, 24 ch-1 sps)
Row 2: ch 4 (counts as dc and ch 1), turn, skip the first dc and the next ch-1 sp, dc in next dc, *ch 1, skip next ch-1 sp, dc in next dc*, repeat 23 times, ending with the last dc in the 3rd ch of the turning ch below (25 dc, 24 ch-1 sps)
Row 3-90: repeat Row 2 (25 dc, 24 ch-1 sps)
Do not fasten off. Check that every row has 25 dc and 24 ch-1 sps, because a missed edge stitch makes the sides wavy.

— Pink Outline Border (Make 1) :

Use dusty rose and the 3.25 mm hook. Join the yarn in any corner of the mesh.
Round 1: 3 sc in the corner, 2 sc in each row end along the long side (180), 3 sc in the next corner, sc in each dc and each ch-1 sp across the short end (49), 3 sc in the corner, 2 sc in each row end along the next long side (180), 3 sc in the next corner, sc in each dc and each ch-1 sp across the last short end (49), join with sl st to first sc, fasten off (470)
The two long sides and two short ends each have their own stitch count, so mark the first stitch of each side. You will work the trims into these stitches.

— Pearl Edge Trim (Make 2) :

Use cream and the 3.25 mm hook. Work one trim along each long side of Round 1, joining in the first stitch after the corner.
Row 1: join cream, ch 1, sc in each of the 180 sts along the long side, do not work into the corners (180)
Row 2: ch 1, turn, *sc in next 3 sts, bobble in next st*, repeat 45 times, fasten off (180)
Keep the bobbles on the outside edge by pushing them toward you as you work. Each side should end with 45 bobbles.

— Scalloped End (Make 2) :

Use cream and the 3.25 mm hook. Work one scalloped end across each short end, joining in the first stitch after the corner.
Row 1: join cream, ch 1, sc in each of the 49 sts across the short end, do not work into the corners (49)
Row 2: ch 1, turn, sl st in first st, *skip 2 sts, 5 dc in next st, skip 2 sts, sl st in next st*, repeat 8 times, fasten off (40 dc + 9 sl st)
Row 3: join dusty rose with a sl st in the first sl st of Row 2, *sc in each of the next 5 dc, sl st in the next sl st*, repeat 8 times, fasten off (40 sc + 9 sl st)
Pin the 8 scallops open when you block so the rose pink rim shows evenly.

— Large Rose (Make 5: 2 dusty rose, 2 burgundy, 1 peach) :

Use the 3.25 mm hook. Each rose is a ruffled strip that you roll up in assembly.
Row 1: ch 37, sc in 2nd ch from hook and in each ch across (36)
Row 2: ch 1, turn, *5 dc in next st, sl st in next st*, repeat 18 times (90 dc + 18 sl st)
Fasten off leaving a 20 inch tail. Roll the strip from the starting end with the petals facing out and sew the base with the tail.

— Small Rose (Make 7: 3 dusty rose, 2 burgundy, 2 peach) :

Use the 3.25 mm hook.
Row 1: ch 25, sc in 2nd ch from hook and in each ch across (24)
Row 2: ch 1, turn, *5 dc in next st, sl st in next st*, repeat 12 times (60 dc + 12 sl st)
Fasten off leaving a 14 inch tail and roll it up the same way as the large rose.

— Rosebud (Make 8) :

Use cream and the 2.75 mm hook.
Row 1: ch 13, sc in 2nd ch from hook and in each ch across (12)
Row 2: ch 1, turn, *5 dc in next st, sl st in next st*, repeat 6 times (30 dc + 6 sl st)
Fasten off leaving a 10 inch tail, then roll it tightly into a little bud.

— Leaf (Make 20) :

Use sage green and the 2.75 mm hook.
Round 1: ch 12, sc in 2nd ch from hook, hdc in next 2 ch, dc in next 4 ch, hdc in next 2 ch, sc in next ch, 3 sc in last ch, then working in the bottom loops of the foundation ch: sc in next ch, hdc in next 2 ch, dc in next 4 ch, hdc in next 2 ch, sc in last ch, join with sl st to first sc, fasten off leaving a tail (23)
For the center vein, backstitch one line of sage yarn from the base to the tip.

Assembly Instructions

  1. Block the Filet Mesh Center with its Pink Outline Border, the Pearl Edge Trims and the Scalloped Ends flat to about 38 by 9 inches, pin the scallops open and let everything dry completely.
  2. Roll each Large Rose and Small Rose strip from the starting end with the petals facing out, and sew the base in a tight spiral so each rose holds its shape.
  3. Arrange the 5 Large Roses and 7 Small Roses in a gently curving line down the center of the mesh, placing the Large Roses toward the ends, and mix the dusty rose, burgundy and peach colors before you pin them down.
  4. Tuck pairs of Leaves under and beside each rose, fill the gaps with the 8 Rosebuds, and sew everything to the mesh with matching yarn.
  5. Keep all the roses inside the pink outline so the Pearl Edge Trims stay clear along both long sides.
  6. Weave in all remaining ends and steam the mesh lightly, holding the iron above the roses so they stay puffy.

Common Mistakes & How to Fix Them

Losing an edge stitch in the mesh: work the last dc of every row into the 3rd ch of the turning ch and count 25 dc each time.

Skipping the side counts in the border: stick to 180 sts per long side and 49 per short end so the trims and scallops fit exactly.

Rolling the roses too loosely: pull the strip snug as you roll and sew through the base several times so they do not unwind.

Sewing the roses too close to the edge: keep them inside the pink outline so the pearl trim does not get crowded.


Denise photo
Denise

Designing cozy, detailed crochet patterns from home, one stitch at a time.


Important Notes

Gauge does not need to be exact, but keep your tension even so the mesh squares stay the same size.

Blocking is important for filet mesh because it opens the squares and lets the runner lie flat.

Hand wash cold, press out the water gently and dry flat, and never wring the roses.


I hope this runner brings a little garden to your table. Happy hooking!

Crochet Abbreviations

01 ch — chain
02 sl st — slip stitch
03 sc — single crochet
04 hdc — half double crochet
05 dc — double crochet
06 st — stitch
07 sp — space
08 bobble — 4 dc worked in the same st, leaving the last loop of each dc on the hook, then yarn over and pull through all 5 loops on the hook

You Ask, We Answer

How big is the finished runner?

About 38 inches long and 9 inches wide, including the scalloped ends and the pearl edge trims.

Can I use a different yarn weight?

Yes. Worsted weight with a 4.0 mm hook gives a wider, longer runner with bigger roses, and you will need roughly 40 percent more yarn.

How do I wash it?

Hand wash in cold water, gently press out the water and lay it flat to dry. Block it again if the mesh loses its shape.